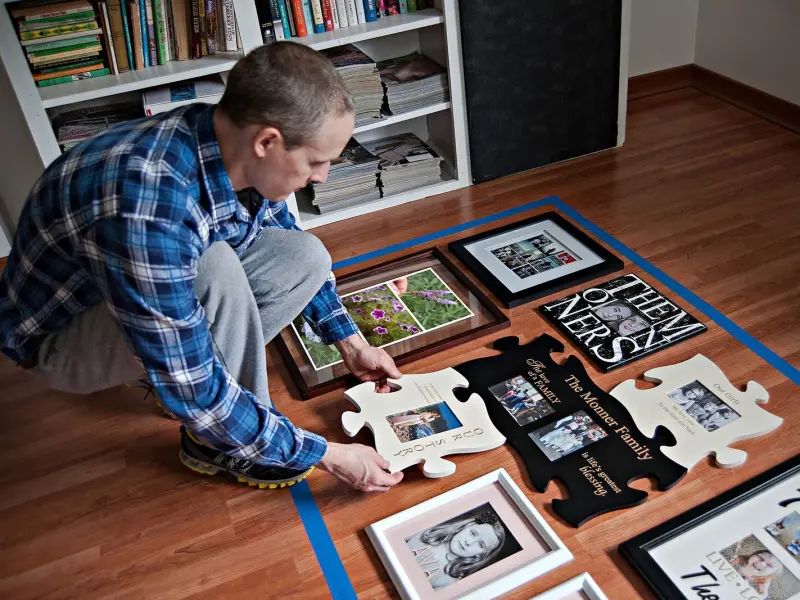
A gallery wall is one of the best ways to make a room feel personal, and one of the easiest ways to end up with a wall full of misplaced holes. The fix is a paper template: trace every frame, mark where its hanger sits, tape the paper shapes to the wall and adjust them until the arrangement looks right. Then you nail straight through the paper. It adds about an hour to the job and saves you the spackle.
What You'll Need
- Kraft paper, butcher paper or old wrapping paper (a roll about 30 inches wide is ideal)
- Pencil and a marker
- Scissors
- Tape measure and a 24-inch level (or a laser level)
- Painter's tape
- Picture hooks rated for your frames' weight, or nails and drywall anchors
- Hammer and a small drill for anchors
- Stud finder for heavy pieces
- Optional: a phone camera, to compare layouts
Step 1: Gather Your Frames and Pick a Style
Collect everything you might hang, plus a few extra pieces. It's easier to leave a frame out than to discover you need one more.
Decide on an overall approach:
- Grid. Identical frames in neat rows with equal spacing. Clean and modern, but requires precise measuring.
- Salon or organic. Mixed sizes and shapes arranged loosely inside an imaginary outer shape. More forgiving and more personal.
- Anchor and build out. One large piece slightly off center with smaller frames arranged around it. A good middle ground.
Lay everything out on the floor first, against the base of the wall, and shuffle frames around until you like the mix. Keep the heaviest-looking pieces toward the bottom and center so the arrangement feels grounded. Snap a phone photo of each version you like.
Step 2: Make a Paper Template for Every Frame
Place each frame face down on the paper, trace around it, and cut out the shape. Label each template with a short description ("blue print," "family photo," "mirror") so you can match them up later.
Now the key part. Flip the frame over and find where it will actually hang:
- Sawtooth hanger or D-ring: measure from the top edge of the frame down to the hanger, and from one side to the hanger. Transfer that point to the template and mark it with a bold X.
- Picture wire: pull the wire up taut toward the top of the frame, as it will be when hanging, and measure from the top of the frame down to the peak of the wire. Mark that point at the horizontal center of the template.
- Two D-rings: mark both points. Two hangers keep larger frames level.
That X is where your nail or hook goes. This step is what makes the template method so accurate.
Step 3: Find Your Height and Spacing
A few guidelines that designers use:
- Center height: the center of the whole arrangement should sit about 57 to 60 inches from the floor, which is roughly average eye level. Galleries often use 57 inches.
- Above furniture: leave 8 to 10 inches between the top of a sofa or console and the bottom of the lowest frame, so the art relates to the furniture instead of floating.
- Width: above furniture, aim for the arrangement to span about two-thirds of the furniture's width.
- Spacing: keep the gaps between frames consistent, somewhere between 2 and 4 inches. Tighter spacing reads as one unit; wider spacing reads as separate pieces. For a grid, use the same gap everywhere. For a salon layout, keep gaps close to equal even when sizes vary.
Step 4: Tape the Templates to the Wall
Use painter's tape so nothing marks the paint. Start with your largest or central piece, placing its template so the arrangement centers on your target height. Then work outward.
Check horizontal lines with the level. In a salon layout you don't need every frame aligned, but it helps to line up a few top or bottom edges so the eye finds some order.
Live with it for a day. Walk past, look at it from the doorway and from the sofa, and take another photo. It's a lot easier to move a piece of paper than a framed picture.
Step 5: Hang Through the Paper
Once you're happy, it's time to commit.
- Decide on hardware. Light frames under about 10 pounds can hang on standard picture hooks driven into drywall. Heavier pieces need either a stud or a properly rated anchor. Mirrors and large framed art often call for two hooks.
- Drive the hook or nail directly through the X on each template.
- Gently tear the paper away around the nail and pull the template off the wall.
- Hang the frame and check it with the level.
If you're using a pair of hangers, measure the distance between the two D-rings on the frame, mark both points on the template, and check that the line between them is level before nailing.
Safety note: before drilling or nailing, keep in mind that electrical wiring often runs vertically from outlets and switches and horizontally at about outlet height. Avoid nailing directly above or below an outlet or light switch, and use a stud finder with a wire-detection mode if you're unsure. When working above furniture on a step stool, keep the stool on a flat floor, not on cushions.
Step 6: Fine-Tune
Frames rarely stay perfectly level on one nail. Small adhesive bumper pads on the bottom back corners keep them from shifting and protect the paint. Removable mounting strips at the bottom corners can also lock a frame in place without extra holes.
Tips
- Unify a mixed collection. If your frames are all different, a single common element ties them together: same frame color, same mat color, or a consistent color palette in the art.
- Mix in non-frame objects. A small mirror, a wall plate, a woven basket or a sconce breaks up a wall of rectangles.
- Leave room to grow. If you plan to add pieces, keep the outer shape loose so a new frame can slot in at an edge.
- Use templates for one big piece too. Even a single large mirror is easier to hang with a paper template and the hanger marked on it.
- Keep the templates. If you move, roll them up with the frames, and you can recreate the same arrangement in the new place.
Common Mistakes
- Hanging too high. The most common error. When in doubt, go lower.
- Spacing too wide. Frames 6 or 8 inches apart look scattered rather than like a single composition.
- Ignoring the wire's stretch. Measuring to the wire at rest, not pulled taut, puts every frame an inch or two too low.
- Starting at one edge. Begin with the center piece and build out, or the whole arrangement can drift off center.
Final Word
The paper template method turns a gallery wall from a guessing game into a planned project. Spend an hour tracing and taping, live with the layout for a day, then nail once. The wall ends up looking deliberate, and the drywall behind it stays mostly intact.